Over the past year or so I’ve been delivering a presentation on the Power Query engine’s data privacy settings at various conferences and Power BI user groups, in an attempt to try to pull together all the knowledge I have on this complex topic. Luckily, when I presented this session at the London Power BI User Group recently, they recorded it and posted it on YouTube here:
If you’re struggling with data privacy errors like:
Formula.Firewall: Query ‘Query1’ (step ‘xyz’) is accessing data sources that have privacy levels which cannot be used together. Please rebuild this data combination.
or
Formula.Firewall: Query ‘Query1’ (step ‘xyz’) references other queries or steps, so it may not directly access a data source. Please rebuild this data combination.
…in either the Power Query Editor in Power BI or Power Query/Get&Transform in Excel, then I hope this video will help you understand why you’re getting these errors and what you can do to avoid them.
A lot of what I show in this session draws on other material, such as:
My five-part series of posts on the Power Query data privacy settings that starts here
My post on how credentials and data privacy settings are stored for dynamic data sources here
My post here on the performance overhead of applying data privacy checks
Ehren von Lehe’s detailed paper on (available here) on how the engine partitions data sources while applying data privacy checks. One of the things I show in the video is that it’s now possible to see these partitions using Power Query Query Diagnostics (see here for some details – although I should probably devote a whole blog post to this in the future)
Lastly, one minor correction to something I said in the video: at the 44:32 mark I do a demo that shows how you can use M functions to avoid a Formula Firewall error. While this trick works in Power BI Desktop and Excel, it results in a dataset that can’t be refreshed in the Power BI Service unfortunately.
This week I was honoured to be a guest on the Guy In A Cube channel, and for my topic I decided to tackle one of life’s eternal questions: why does Power BI query my data source more than once when I refresh my dataset?
You can watch the video here:
Although I’ve never answered this question directly in a blog post before, nevertheless almost every technique I showed in the video is something I’ve blogged about so I thought it would be useful to collect all the links to these posts in one place to provide some background to what I show in the video.
The first thing to say is that this is really a Power Query question, not just a Power BI question; a lot of what I show will therefore be relevant to Excel’s Get&Transform, Power BI dataflows and every other manifestation of Power Query out there, although I can’t guarantee that all the options and behaviour will be the same in these places.
If you’re developing in Power BI Desktop and you think that refresh is taking a long time, you should definitely check whether the Power Query engine is hitting your data source more than once. There are lots of ways to do this. Some data sources have tools that show when they are queried, such as the Run History screen in Microsoft Flow that I show in the video or SQL Server Profiler. Other ways include using Fiddler for web services or Process Monitor for files.
Next, if you find that Power Query is indeed querying your data source multiple times, the most common explanation is that it’s doing a “background refresh”. This happens by default when you refresh a dataset and is Power Query refreshing all the data previews that you see when you click on a step in the Power Query Editor window. In most cases this is so quick you don’t notice it but when you have lots of queries with lots of steps it can be a gigantic problem. You can turn it off in the Options dialog in Power BI Desktop, as shown in the video, or in the Excel Query Options dialog. I blogged about this issue here.
Another possible reason is the data privacy settings you have applied. This is a gigantic, complex topic and something that I and other people have blogged about many times. I wrote a multi-part series of posts explaining data privacy settings starting here and there’s also a great explanation of what’s going on in behind the scenes written by the dev team that I link to here; I also wrote a post here showing an example of the performance impact of data privacy checks. As I say in the post, however, do not play around with these settings unless you really know what you’re doing.
If you’re ok with writing some M code, using the technique I blogged about here to implement basic query folding on a web data source can be important – in the example in the video, it was doing this that reduced the number of calls to the web service from six to three.
Some transformations can also lead to data being read from a data source more than once. For example, in this post I showed how a merge transformation leads to multiple reads from the same Excel file and how to stop this happening and drastically improve performance.
Moving on, another important lesson to learn is how referenced queries are evaluated. This is one of the most counter-intuitive things about Power Query! With the set of referenced queries used in my demo:
…where three queries called Referenced Query 1, Referenced Query 2 and Referenced Query 3 each reference a query called Call Web Service and are loaded into a dataset (and where Call Web Service is not loaded into the dataset), most people would assume that when a refresh takes place the following happens:
The Call Web Service query is run, getting the data from the web service
The data returned is then passed to Referenced Query 1, Referenced Query 2 and Referenced Query 3
This is wrong. In fact what happens is this:
Referenced Query 1 is refreshed. Because it references the Call Web Service query, that means the Call Web Service query is also evaluated.
Referenced Query 2 is refreshed. Because it references the Call Web Service query, that means the Call Web Service query is also evaluated.
Referenced Query 3 is refreshed. Because it references the Call Web Service query, that means the Call Web Service query is also evaluated.
This explains why the Call Web Service query is still being evaluated three times once the M code above has been added to it. You can read a detailed explanation of how referenced queries are evaluated here.
There is something we can do to help here though: the Power Query engine can cache the results returned from some types of data source, such as web services, but to take full advantage of this caching in this particular scenario you have to turn off the Enable Parallel Loading Of Tables option on the Options dialog as I show here. With that done, each of the three referenced queries run one after the other, instead of in parallel. When the first of these queries runs its calls the Call Web Service query, which gets data from the web service; when the next two queries run, though, and they trigger two more evaluations of Call Web Service, the data for the call to the web service has been cached. This caching can be turned off using the IsRetry option in Web.Contents as Curt Hagenlocher explains in a comment here.
The final thing shown in the video is that the infamous Table.Buffer M function does not improve performance in this case and in fact makes performance worse. If you use Table.Buffer inside the Call Web Service query it will indeed buffer the result of the call to the web service into memory, but the data that is buffered cannot be shared between separate query executions – so the buffering happens three times, once for each time Call Web Service is evaluated by the three referenced queries. Again this is something discussed in this post. Of course there are plenty of other scenarios where Table.Buffer will help performance, but these will only be in cases where the same query requests data from the same data source more than once.
Phew, that was a lot. I don’t pretend to know everything about when and why Power Query gets data from a data source multiple times but this is the sum total of my knowledge right now. I hope it’s useful!
[Update: it’s just been pointed out to me, quite rightly, that the names of my queries are confusing. For example, “Referenced Query 1” is the query doing the referencing, not the query being referenced – which is Call Web Service. I haven’t changed the names because I want the blog post to remain consistent with the video, and I hope the diagrams and the context make everything clear]
The Query Editor in Power BI/Excel Get&Transform/Power Query has a number of built-in ways to filter data in date columns relative to the current date, such as the “In the Previous” option. However these filters behave in a way I find non-intuitive (and I’m not alone) and it’s not obvious how to get the behaviour I think most people would expect. In this post I’ll show you what the built-in relative date filters actually do and how you can get change them to do something more useful.
Let me give you a simple example. Imagine you’re using the following table of dates (in DD/MM/YYYY format) in an Excel table as a data source:
Now, let’s also assume that the today’s date is January 8th 2018 and you only want to load data from the last six months. If you load the data into Power BI in a new query:
…and then click on the dropdown menu in the top right-hand corner of the Date column (highlighted), you can select Date Filters/In the Previous:
…and then set up the filter for “Keep rows where ‘Date’ is in the previous 6 months” as shown here:
…you get the following table back:
Six out of the seven dates in the original table are returned, but not the six I would expect. Remember that today’s date is January 8th 2018, and notice that January 1st 2018 is not present in the filtered table and July 1st 2017 is present! I don’t know about you, but I would say that January 1st 2018 should be considered as being “in the previous 6 months” and July 1st 2017 should not be.
The reason this is happening is that the M code generated by the UI uses the Date.IsInPreviousNMonths function, so as a result the filter is getting all the dates that are present in the six months before the month that today’s date is in. Hmmmmm.
In many cases you can get a “last six months” filter of the type I would expect quite easily, by altering the filter dialog box shown above to filter by the last 5 months and including an Or condition that also filters by the current month, like so:
This returns the following table:
You’ll see now that January 1st 2018 is present and July 1st 2017 is not present. However you will need to be careful with this: if your source data contains dates that are after today’s date but in still in the current month, these dates will now also be included! For example, if the source data is changed to include a new row for January 31st 2018:
This new filter will include January 31st 2018 because it is in the same month as today’s date:
What if you want to exclude dates that are after today but in the current month? This is where things get tricky, and where you’ll need to write some M code. Let’s imagine that you want to get all the dates that occur in the range July 9th 2017 (the day after the date that is six months before today) and January 8th 2017 (today). You can do this by editing the original query as follows:
let
Source =
Excel.Workbook(
File.Contents("C:\SixMonths.xlsx"),
null,
true
),
Source_Table =
Source{[Item="Source",Kind="Table"]}[Data],
ChangedType =
Table.TransformColumnTypes(
Source_Table,
{{"Date", type date}}
),
EndDate =
Date.From(DateTime.FixedLocalNow()),
StartDate =
Date.AddDays(Date.AddMonths(EndDate,-6),1),
FilteredRows =
Table.SelectRows(
ChangedType,
each [Date]>=StartDate and [Date]<=EndDate
)
in
FilteredRows
In this query, the EndDate step returns today’s date using DateTime.FixedLocalNow(), the StartDate step returns the day after the date that is six months before today’s date, and the FilteredRows step filters the dates so that only those that occur between StartDate and EndDate are returned. And yes, I checked, if you do this with a SQL Server data source then query folding does occur.
With this query, you finally get the dates you’d expect from your filter:
To be honest, though, I don’t think it should be this hard!
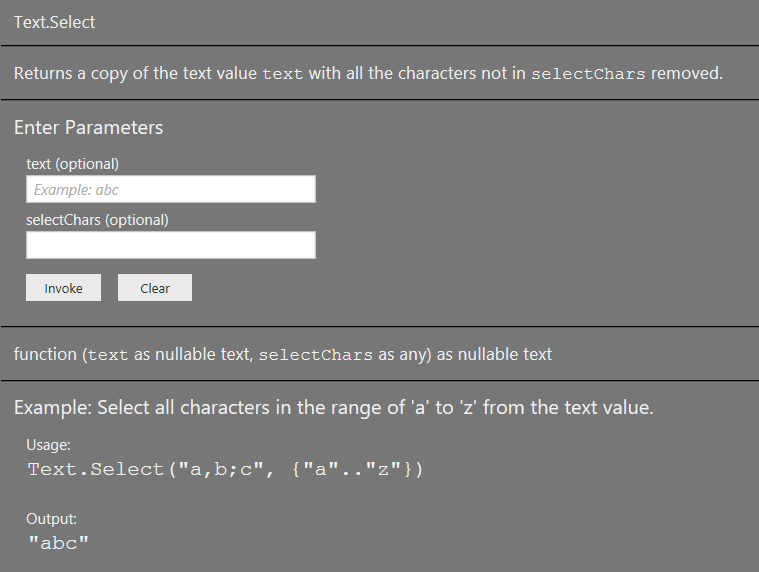
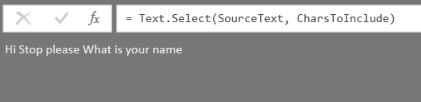
A new, as-yet undocumented, M function appeared in the December 2017 release of Power BI Desktop (I assume it will appear in Excel soon): Text.Select. Here’s the documentation from the Query Editor:
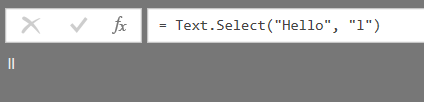
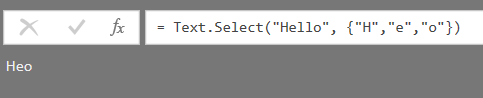
It’s very easy to use: the first parameter takes a text value, the second parameter takes either a text value containing a single text value or a list of single characters, and it returns the text from the first parameter minus all characters that are not in the second parameter. For example, the expression:
There are a lot of scenarios where Text.Select will be useful, and the one that I immediately thought of was to remove punctuation from text. In one of my earliest M posts on this blog I used Text.Remove to do this while trying to find Shakespeare’s favourite words, but the problem with this approach is that you have to explicitly specify all the characters you want to remove from your text – and there could be a lot of characters that need to be excluded. Text.Select is a much better option here because it allows you to specify the characters you want to keep.
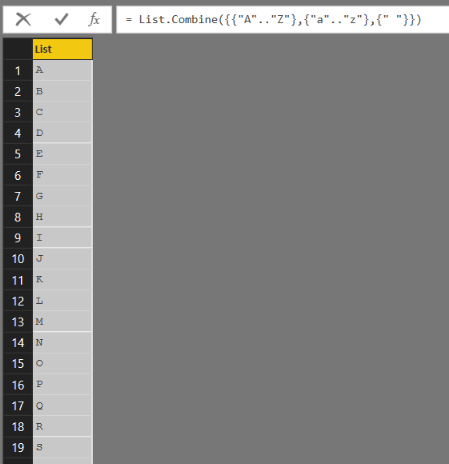
The first step to doing this is to understand how to construct the list of the characters you do want to keep. You can do this very easily in M when declaring a list using the range technique I blogged about here, so you should read that post before carrying on. The following expression returns a list containing all 26 uppercase and lowercase letters in the alphabet plus a space:
Of course depending on the scenario or language you’re working with you may want to include other characters, for example apostrophes or letters with accents, too. Here’s a slightly more complex example of how this list can be used with Text.Select:
[sourcecode language=”text”]
let
SourceText = "Hi! Stop, please. What is your name?",
CharsToInclude = List.Combine({{"A".."Z"},{"a".."z"},{" "}}),
RemovePunc = Text.Select(SourceText, CharsToInclude)
in
RemovePunc
[/sourcecode]
The query above takes the text “Hi! Stop, please. What is your name?” and returns the text “Hi Stop please What is your name”.
Finally, because I couldn’t read my old M code without cringing a little bit, here’s an updated version of my query that gets the top 100 words from the Complete Works Of Shakespeare (direct from the Project Gutenberg website):
[sourcecode language=”text”]
let
URL = "http://www.gutenberg.org/cache/epub/100/pg100.txt",
Source = Text.FromBinary(Web.Contents(URL)),
Lowercase = Text.Lower(Source),
RemovePunctuation = Text.Select(Lowercase,
List.Combine({{"a".."z"},{" "}})),
SplitText = Splitter.SplitTextByWhitespace(QuoteStyle.None),
SplitIntoWords = SplitText(RemovePunctuation),
RemoveBlanks = List.Select(SplitIntoWords, each _<>" "),
TableFromList = Table.FromColumns({RemoveBlanks},
type table [Word=text]),
FindWordCounts = Table.Group(
TableFromList,
{"Word"},
{{"Count", each Table.RowCount(_), type number}}),
SortedRows = Table.Sort(
FindWordCounts,
{{"Count", Order.Descending}}),
KeptFirstRows = Table.FirstN(SortedRows,100)
in
KeptFirstRows
[/sourcecode]
Here they are as a word cloud (yes I know it’s not good dataviz practice, but it’s for fun):
You can download the .pbix file with this example in here.
BONUS FACT: another new M function appeared recently too: Function.From. You can read all about it on this thread on the Power Query forum.
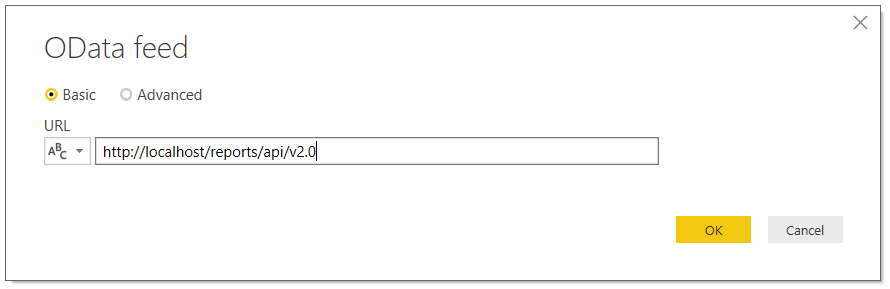
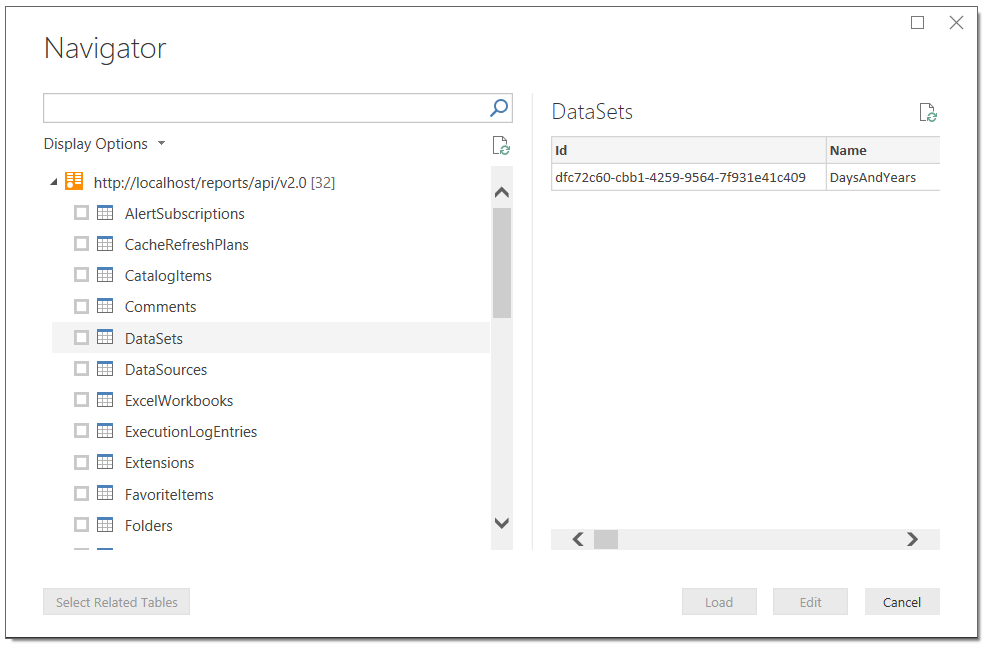
Interestingly, the new API seems to be OData compliant – which means you can browse it in Power BI/Get&Transform/Power Query and build your own reports from it. For example in Power BI Desktop I can browse the API of the SSRS instance installed on my local machine by entering the following URL:
This means you can build Power BI reports on all aspects of your SSRS reports (reports on reports – how meta is that?), datasets, data sources, subscriptions and so on. I guess this will be useful for any Power BI fans who also have to maintain and monitor a large number of SSRS reports.
However, the most interesting (to me) function isn’t exposed when you browse the API in this way – it’s the /DataSets({Id})/Model.GetData function. This function returns the data from an SSRS dataset. It isn’t possible to call this function direct from M code in Power BI or Excel because it involves making a POST request to a web service and that’s not something that Power BI or Excel support. However it is possible to call this function from a Power BI custom data extension – I built a quick PoC to prove that it works. This means that it would be possible to build a custom data extension that connects to SSRS and that allows a user to import data from any SSRS dataset. Why do this? Well, it would turn SSRS into a kind of centralised repository for data, with the same data being shared with SSRS reports and Power BI (and eventually Excel, when Excel supports custom data extensions). SSRS dataset caching would also come in handy here, allowing you to do things like run an expensive SQL query once, cache it in SSRS, then share the cached results with multiple reports both in SSRS and Power BI. Would this really be useful? Hmm, I’m not sure, but I thought I’d post the idea here to see what you all think…
A few years ago I started blogging about Power Query. Back then life was simple: I put “Power Query” in the title of a post and everyone knew what I was writing about, because Power Query was an Excel add-in you could download and install. Now, however, the technology has been renamed “Get & Transform” in Excel 2016 and is a native feature of Excel; the name “Power Query” only applies to the add-in for Excel 2010 and 2013. What’s more, the same technology is used in Power BI’s Query Editor and it’s also now in Azure Analysis Services, Analysis Services 2017 Tabular and the Common Data Service. This is obviously a good thing – I think Power Query is one of the best things to come out of Microsoft in the last decade – but it also presents me with a problem. How can I write about this technology if it doesn’t have a single, official, easily identifiable name?
In more recent times I’ve written posts with unwieldy names like “Introduction to Insert Topic Name Here in Power Query/Power BI/Excel 2016 Get & Transform” and in the future I suppose this will have to grow to “Introduction to Insert Topic Name Here in Power Query/Power BI/Excel 2016 Get & Transform/Analysis Services Data Loading/Common Data Service”. Tagging and categorising blog posts can help here, I know, but it’s the title of a blog post that’s the main determining factor as to whether it gets read or not when someone is looking at a list of search results. It’s getting ridiculous, but how else can I ensure that someone searching for the solution to a data loading problem in Excel 2016 Get & Transform will find a post I’ve written that contains the answer but shown in Power BI?
Inside Microsoft I understand that the team that builds this technology is known as the Power Query team. I certainly think about this technology as being called Power Query, as do a lot of other people in the community. However, my argument is that I can’t just use the name “Power Query” when I’m writing or speaking about this technology because most of its users – especially those who are new to it and who need the most help – don’t think of it as “Power Query”. They think of it as Excel 2016 Get & Transform, the Query Editor in Power BI Desktop and so on, the specific instances of it.
Maybe I’m making too big a deal of this, but in my opinion this is a problem not just for me but for Microsoft too. We all know how much developers rely on internet searches to find solutions to problems, and not having a single name for this technology makes it much harder to search successfully. This in turn makes it less likely that when a developer runs into a problem they will be able to solve it, which in turn means they are less likely to want to use this technology in future.
What’s the answer? It has to be to make the “Power Query” brand visible somewhere in the UI of all the products that use Power Query technology. I know there’s a risk of confusing users instead of helping them here (am I using Power Query or Power BI?), but it could be as simple as making a few small changes like renaming the “Query Editor” window to be the “Power Query Editor”:
I think that would be enough to let people know that “Power Query” is a technology in its own right and that content referring to “Power Query” is relevant to Excel, Power BI, SSAS and everywhere else that Power Query is used. It would also be nice if, now that M is the official name of the M language (and not Power Query Formula Language), the Advanced Editor window and the Custom Column dialog let users know that the code they were writing in them was in a language called M and not some mysterious, nameless scripting language.
What do you think? I’m interested to hear your comments and opinions…
UPDATE: victory is ours! See this comment from Faisal Mohamood of the Power Query team below – Hey there Chris – what you are saying makes complete sense. Power Query is the name of this capability and we will highlight the name of this capability as such in experiences where you are working with Power Query (and M).
Something I didn’t understand at all when I started writing this series was how the “None” data privacy level worked. Now, however, the ever- helpful Curt Hagenlocher of the Power Query dev team has explained it to me and in this post I’ll demonstrate how it behaves and show how data privacy levels can be inherited from other data sources.
Let’s go back to the original example I used in part 1 of this series where I showed how data from an Excel workbook can be combined with data from SQL Server, and how the data privacy settings on each data source determine whether query folding takes place or not (I suggest you read that post before continuing to get some background). Now, imagine that the Excel workbook is in a folder called C:\Data Privacy Demo, and a query called FilterDay is used to get data from it:
let
Source =
Excel.Workbook(
File.Contents(
"C:\Data Privacy Demo\FilterParameter.xlsx"
)
, null, true),
FilterDay_Table =
Source{[Item="FilterDay",Kind="Table"]}[Data],
ChangedType =
Table.TransformColumnTypes(
FilterDay_Table,
{{"Parameter", type text}}
),
Output =
ChangedType{0}[#"Parameter"]
in
Output
This query gets the name of a weekday from a table in the workbook, for example the text “Friday”:
When this query is referenced in a second query that uses the day name to filter the data in a table in SQL Server, like so:
let
Source = Sql.Databases("localhost"),
DB = Source{[Name="Adventure Works DW"]}[Data],
dbo_DimDate = DB{[Schema="dbo",Item="DimDate"]}[Data],
RemovedColumns = Table.SelectColumns(dbo_DimDate,
{"DateKey", "EnglishDayNameOfWeek"}),
FilteredRows = Table.SelectRows(RemovedColumns,
each ([EnglishDayNameOfWeek] = FilterDay))
in
FilteredRows
…and the query is run for the first time, then you will get prompted for credentials to access SQL Server and after that you’ll get prompted to set data privacy levels on both data sources used:
The dropdown boxes in the second column allow you to set the data privacy settings for each data source, but look at the data sources listed in the first column. There are two things to point out:
The data sources the two queries are accessing are the DimDate table in the Adventure Works DW database on localhost, and the file C:\Data Privacy Demo\FilterParameter.xlsx. However you’re not being prompted to set data privacy levels on those exact data sources, you’re being prompted to set data privacy levels on the localhost instance and the c:\ drive
The data source names are displayed in dropdown boxes, so there are other options to select here
Clicking each dropdown box is revealing:
For the SQL Server database you can set the data privacy level at two places: the localhost instance (the default), or the Adventure Works DW database on that instance. For the Excel workbook you get set the data privacy level at three places: the c:\ drive (the default), the folder c:\Data Privacy Demo that the Excel workbook is in, or the Excel workbook itself.
Let’s say you accept the defaults and set the data privacy settings to Public on localhost and the c:\ drive:
As you would expect after reading part 1 of this series, the query runs and query folding takes place:
Now, let’s say you copy the Excel file up to the root of the c:\ drive and rename it to filterparameter2.xlsx, then update the FilterDay query above to load data from this new Excel file instead:
let
Source =
Excel.Workbook(
File.Contents(
"C:\FilterParameter2.xlsx"
)
, null, true),
FilterDay_Table =
Source{[Item="FilterDay",Kind="Table"]}[Data],
ChangedType =
Table.TransformColumnTypes(
FilterDay_Table,
{{"Parameter", type text}}
),
Output =
ChangedType{0}[#"Parameter"]
in
Output
At this point, when you click the Data Source Settings button and look at the permissions for the file c:\filterparameter2.xlsx you will see that the privacy level is set to None:
However, it behaves as if it has a data privacy level of Public: the second query that gets data from SQL Server runs successfully, query folding still takes place and you are not prompted to set a data privacy level for this data source. Why?
The “None” data privacy level means that no privacy level has been set for this exact data source. However, when this happens the engine checks to see if a data privacy level has been set for the folder that this file is in and then for all folders up to the root. In this case, since the data privacy level has been set to Public for the c:\ drive, all files in all folders on that drive that have a data privacy level set to None (like this one) will inherit the c:\ drive’s setting of Public:
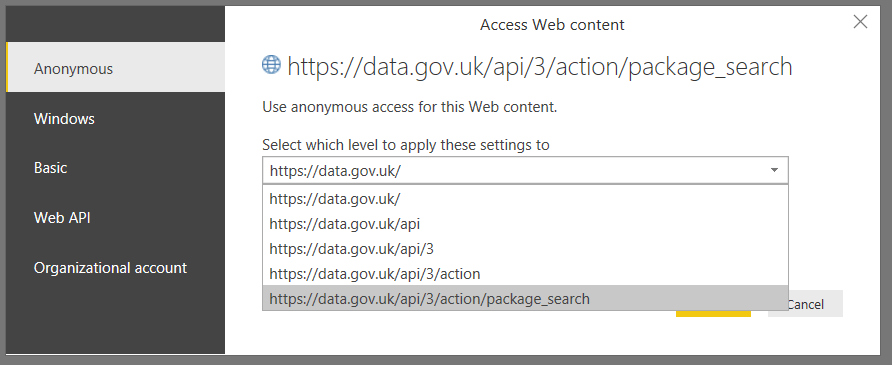
The same goes for databases on a SQL Server instance: they can inherit the data privacy settings set for the instance. The same is also true for web services, where data privacy settings can be set for different parts of a URL; for example, here’s the list of options for a call to the https://data.gov.uk/api/3/action/package_search web service described in part 2 of this series:
The general rule is that the engine looks for permissions for the exact data source that it’s trying to access, and if none are set then it keeps looking for more general permissions until it runs out of places to look.
In my opinion, I don’t think the way the “None” privacy level and inheritance works is very clear right now – it makes sense now I’ve had it explained to me, but the UI does nothing to help you understand what’s going on. Luckily it sounds like the dev team are considering some changes to make it more transparent. I would like to see the fact that data privacy levels have been inherited for a data source, and where they have been inherited from, called out in the Edit Permissions dialog.
In the first two parts of this series (see here and here) I showed how Power BI/Power Query/Excel Get & Transform’s data privacy settings can influence whether query folding takes place or even whether a query is able to run or not. In this post I’m going to talk about the situations where, whatever data privacy level you use, the query will not run at all and you get the infamous Formula.Firewall error.
I’ll admit I don’t understand this particular topic perfectly (I’m not sure anyone outside the Power Query dev team does) so what I will do is explain what I do know, demonstrate a few scenarios where the error occurs and show how to work around it.
Assume you have the two data sources described in my previous posts: an Excel workbook that contains just a single day name, and the DimDate table in SQL Server that can be filtered by the day name from Excel. Let’s also assume that both data sources have their data privacy levels set to Public. The following query, called FilterDay, loads the data from Excel and returns a text value containing the day name:
let
Source =
Excel.Workbook(
File.Contents("C:\FilterParameter.xlsx"),
null, true),
FilterDay_Table =
Source{[Item="FilterDay",Kind="Table"]}[Data],
ChangedType =
Table.TransformColumnTypes(
FilterDay_Table,
{{"Parameter", type text}}
),
Output =
ChangedType{0}[#"Parameter"]
in
Output
Now, look at the following query:
let
Source =
Sql.Database(
"localhost",
"adventure works dw",
[Query="select DateKey, EnglishDayNameOfWeek
from DimDate"]),
FilteredRows =
Table.SelectRows(Source,
each ([EnglishDayNameOfWeek] = FilterDay)
)
in
FilteredRows
It filters the contents of the DimDate table and only returns the rows where the EnglishDayNameOfWeek column matches the day name returned by the FilterDay query. Notice that there are two steps in the query, Source (which runs a SQL query) and FilteredRows (which does the filtering). Here’s the output:
As you can see from the screenshot, the query runs. In fact it runs whatever data privacy settings you have set on both the data sources, although it’s worth pointing out that if you use your own SQL in an M query (as I do in this case) this stops query folding in all subsequent steps, as described here.
Now take a look at the following version of the query:
let
Source =
Table.SelectRows(
Sql.Database(
"localhost",
"adventure works dw",
[Query="select DateKey,
EnglishDayNameOfWeek
from DimDate"]
),
each ([EnglishDayNameOfWeek] = FilterDay)
)
in
Source
The important difference here is that there is now one step in this query instead of two: the query and the filtering take place in the same step. Even more importantly, regardless of the data privacy settings, the query fails with the error:
Formula.Firewall: Query ‘DimDate With Native Query Single Step Fails’ (step ‘Source’) references other queries or steps, so it may not directly access a data source. Please rebuild this data combination.
The problem here is that the Power Query engine is not allowed to access two different data sources originating from different queries in the same step – as far as I understand it this is because it makes it too hard for the engine to work out whether a step connects to a data source or not, and so which data privacy rules should be applied.
At this point you might think that it’s straightforward to break your logic up into separate steps, as in the first example above. However there are some situations where it’s not so easy to work around the problem. For example, consider the following query:
let
Source =
Sql.Database(
"localhost",
"adventure works dw",
[Query="
select DateKey, EnglishDayNameOfWeek
from DimDate
where
EnglishDayNameOfWeek='" & FilterDay & "'"
]
)
in
Source
In this example I’m dynamically generating the SQL query that is being run and passing the name of the day to filter by into the WHERE clause. In the two previous examples the query that was run had no WHERE clause and the filtering on day name took place inside Power BI – in this case the filtering is happening inside the query, so in order to generate the WHERE clause I have to refer to the value that the FilterDay query returns in the same step. Therefore, this query also gives the same Formula.Firewall error seen above.
How can you work around this? Well, the following version of the query that attempts to reference FilterDay in a separate step doesn’t work either:
let
DayAsStep = FilterDay,
Source =
Sql.Database(
"localhost",
"adventure works dw",
[Query="
select DateKey, EnglishDayNameOfWeek
from DimDate
where
EnglishDayNameOfWeek='" & DayAsStep & "'"
]
)
in
Source
Luckily, it turns out that if you use the Value.NativeQuery() function to run your query instead you can avoid the error. As I showed here, you can use this function to pass parameters to SQL queries. If you generate the record containing the parameters for the query as a separate step (called ParamRecord here), like so:
let
Source = Sql.Database("localhost", "adventure works dw"),
ParamRecord = [FilterParameter=FilterDay],
Query = Value.NativeQuery(
Source,
"select DateKey, EnglishDayNameOfWeek
from DimDate
where
EnglishDayNameOfWeek=@FilterParameter",
ParamRecord)
in
Query
Then the query runs successfully.
There is another way to avoid the error. In all the examples above I have two queries: one to get data from Excel, one to get filtered data from SQL Server. If these two queries are combined into a single query, it doesn’t matter if data from different data sources is accessed in the same step. So, for example, unlike all of the queries above the following query does not reference any other queries; instead it gets the day name from the Excel workbook in the ExcelSource step and then runs the dynamic SQL query in the SQLSource step, and runs successfully:
let
ExcelSource =
Excel.Workbook(
File.Contents("C:\FilterParameter.xlsx")
, null, true),
FilterDay_Table =
ExcelSource{[Item="FilterDay",Kind="Table"]}[Data],
ChangedType =
Table.TransformColumnTypes(FilterDay_Table,
{{"Parameter", type text}}),
FilterDayStep =
ChangedType{0}[#"Parameter"],
SQLSource = Sql.Database(
"localhost",
"adventure works dw",
[Query="
select DateKey, EnglishDayNameOfWeek
from DimDate
where
EnglishDayNameOfWeek='"
& FilterDayStep &
"'" ])
in
SQLSource
Clearly the M engine doesn’t get confused about accessing data from different sources in the same step if those data sources are created in the same query.
Of course you can avoid the Formula.Firewall error and make query folding happen as often as possible by turning off data privacy checks completely in the Options dialog. This will be the subject of the next post in this series.
When you connect to a relational database like SQL Server in Power BI/Power Query/Excel Get & Transform you have two choices about how to get the data you need:
You can choose a table from the database and then either use the Query Editor UI or write some M to get the data you need from that table. For example, you might choose a table that has one row for every product that your company sells and then, using the UI, filter that down to only the products that are red.
You can enter a SQL query that gets the data you need.
Something that you might not realise is that if you choose the second option and then subsequently use the UI to apply even more filtering or transformation, then those subsequent steps will not be able to make use of query folding.
As an example of option (1), imagine you connect to the DimProduct table in the SQL Server Adventure Works DW database like so:
The following M query is generated by the Query Editor when you filter the table to only return the red products and remove all columns except EnglishProductName. That’s very easy to do so I won’t describe it, but here’s the M:
[sourcecode language=”text”]
let
Source =
Sql.Databases("localhost"),
#"Adventure Works DW" =
Source{
[Name="Adventure Works DW"]
}[Data],
dbo_DimProduct =
#"Adventure Works DW"{
[Schema="dbo",Item="DimProduct"]
}[Data],
#"Filtered Rows" =
Table.SelectRows(
dbo_DimProduct,
each ([Color] = "Red")
),
#"Removed Other Columns" =
Table.SelectColumns(
#"Filtered Rows",
{"EnglishProductName"}
)
in
#"Removed Other Columns"
[/sourcecode]
Using the View Native Query option, you can find out that the following SQL is generated to get this data:
[sourcecode language=”text”]
select [_].[EnglishProductName]
from [dbo].[DimProduct] as [_]
where [_].[Color] = ‘Red’
[/sourcecode]
It’s pretty clear that query folding is taking place for the filter on “red” and for the selection of the required column.
However, if you enter the following SQL query when you first connect to the database:
[sourcecode language=”text”]
select * from dimproduct
[/sourcecode]
And then, after that, filter the table and remove columns in exactly the same way, you get the following M query:
[sourcecode language=”text”]
let
Source =
Sql.Database(
"localhost",
"Adventure Works DW",
[Query="select * from dimproduct"]),
#"Filtered Rows" =
Table.SelectRows(
Source,
each ([Color] = "Red")),
#"Removed Other Columns" =
Table.SelectColumns(
#"Filtered Rows",
{"EnglishProductName"})
in
#"Removed Other Columns"
[/sourcecode]
If you now try to use the View Native Query option on either the Removed Other Columns or Filtered Rows steps you’ll find it’s greyed out, indicating query folding is not taking place for those steps:
The query you enter is run and then Power BI applies the filter and selects the column itself in the resultset that the SQL query returns.
This obviously has big implications for performance. The lesson here is that if you’re going to write your own SQL query in the Query Editor, you should make sure it does all of the expensive filters and transformations you need because anything else you do in the query will happen outside the database in Power BI or Excel.
A really useful new feature was added to Get & Transform (the functionality previously known as Power Query) in the latest updates for the Office 365 click-to-run version of Excel 2016: the ability to export and import ODC files containing M queries. This makes sense given that Get & Transform is the new default way for loading data into Excel, but it’s nonetheless very welcome.
It’s very straightforward to use, and all the details are available in the section on “How do I get data from recently used sources, Office Database Connection (ODC) files, other workbook connections, or tables?” halfway down this article:
You just need to right-click on your query in the Queries & Connections pane to export it:
…and after that you can import the ODC file in the normal way when you want to create a new connection.
As always, I want more though. Some ideas/requests:
Power BI Desktop should be able to import and export ODC files in this format too: it would make it much easier to reuse queries. Vote here if you agree.
Power BI should have a central repository for Power BI and Excel users to store these ODC files for easy sharing and reuse by report developers. It’s a shame that the Azure Data Catalog integration with Excel/Power BI hasn’t had any love recently because that would have been the obvious place to create such a repository.
We also desperately need some kind of source control for M queries inside Excel and Power BI (not quite the same requirement as the previous point). I know a lot of people are doing this manually with services like Git, but I would love to be able to check my code in and out directly from the Query Editor.
I’ve also noticed that the old “Load To” dialog (that I found incredibly confusing) has been replaced by the standard Excel Import Data dialog in this release – another improvement. After you hit Close & Load in the Query Editor, this is what you now see: